Let’s be honest—our smartwatches are basically glued to our wrists these days. Sometimes we even talk to them, but hey, no judgment here. Nothing ruins a techie vibe faster than a tired or boring watch band, so let’s actually fix that.
Changing the band on a smartwatch is usually simple: press the quick-release pin or button, slide the old band out, and pop the new one in.
Swappable bands let us switch from “office mode” to “weekend adventure” in seconds. If messing with gadgets makes you nervous, don’t stress—the process is mostly tool-free and safe.
Special bands like metal or leather might need a little extra know-how, but we’ll cover those too. We picked up these tips from this YouTube guide and advice from folks who’ve swapped a few bands themselves.
Let’s keep our wrists looking sharp and our smartwatches fresh. Even our gadgets need a style boost now and then.
Preparing for Band Replacement
Before we dive in, let’s get set up properly. This way we avoid accidental scratches, lost screws, or that classic “where did I put the screwdriver?” moment.
Preparation saves us headaches and maybe a few curse words.
Identifying Your Smartwatch Model
First up: figure out which smartwatch we’ve got. Different models use different attachment methods, band widths, or even sneaky tricks for removal.
Check the back of the watch or the original box. The model number usually hides there, mixed in with the branding and serial numbers.
If we can’t spot the model number, open the companion app on our phone. Most apps tell us the model somewhere in the settings.
Still lost? Try searching “how to change band on [watch name]” online—there’s always a video or article, like these handy YouTube guides.
Once we know the model, we won’t waste time with the wrong band size or by using the wrong removal method.
Gathering Tools and Supplies
We don’t need a full toolbox, but a few basic items help a lot. Here’s what usually works best:
- Spring bar tool or small flathead screwdriver
- Replacement band that actually fits our watch
- Small bowl or magnet tray for those runaway screws and pins
- Microfiber cloth (for a final polish, if you care about that kind of thing)
Some bands—especially metal or leather—might need extra pins or a special clasp. Double-check the replacement band’s packaging before you start.
If you like visuals, this TikTok watch strap replacement guide is super quick and helpful.
Here’s a simple table if you want to keep things neat:
| Tool | Purpose |
|---|---|
| Spring bar tool | Remove/attach band pins |
| Small screwdriver | Remove screws (if needed) |
| Bowl/tray | Store small parts |
| Microfiber cloth | Clean watch & band |
Setting Up a Clean Workspace
Tiny screws love to vanish into carpets, so let’s work at a clean, flat table with good lighting.
Clear off any clutter—coffee mugs, snack wrappers, those pens that never work. Lay down a white towel or napkin to catch any small parts.
Keep all your tools within arm’s reach. Running around mid-repair just adds chaos.
If your table’s near the edge, scoot back a bit—gravity always wins when something starts rolling.
Once we’re set, swapping the band feels a lot less like a secret mission and way more like a quick DIY.
Understanding Watch Band Types
Swapping a smartwatch band isn’t rocket science, but knowing what type we have saves time and confusion.
Some bands pop off with your thumb. Others make you wish you had tiny screwdrivers for fingers.
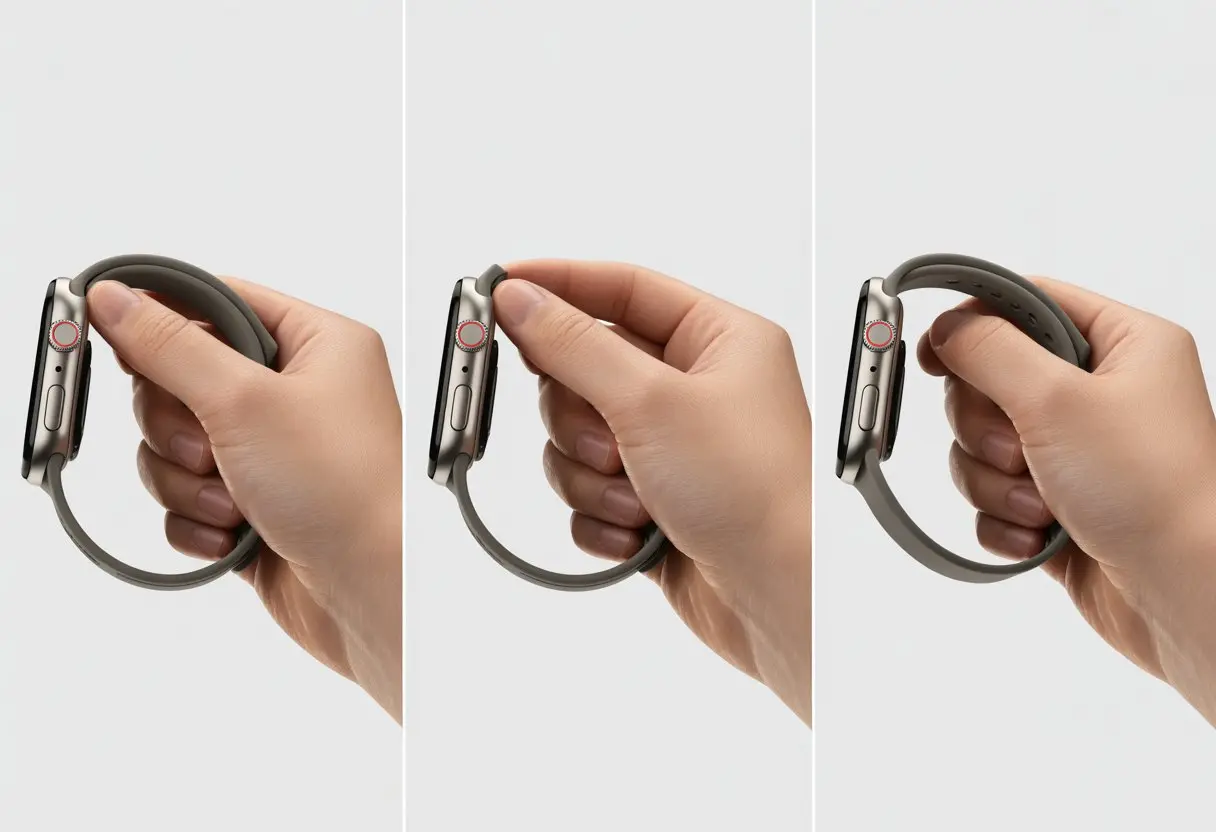
Quick-Release Pin Bands
Quick-release pin bands are honestly a game-changer. These bands have a little pin or lever underneath.
No fancy tools needed—just your thumb and a little patience.
To swap them, just slide the pin sideways. The band pops right off, almost like magic.
No springs flying, no screws lost forever. If you like changing your style often, these are the way to go.
Want a video? Watch bands can be changed very quickly with this style.
If you want convenience, quick-release bands win. Just don’t accidentally detach your watch during a handshake.
Spring Bar Bands
Spring bar bands use a small metal rod with a spring inside, squeezed between two holes on the lugs. It sounds complicated, but it’s actually clever.
To remove or attach these, we grab a spring bar tool or a thin screwdriver. Poke one end in, compress the bar, and wiggle it loose.
It’s not hard, but it can take a couple tries to get the hang of it.
Spring bars are sturdy, which is nice for anyone who runs or talks with their hands. For a more detailed breakdown, check this comprehensive watch band guide.
Just be ready for a spring bar to go flying—they vanish faster than socks in the laundry.
Leather Strap Options
Leather straps just have that classic vibe. Sometimes they use quick-release pins, sometimes spring bars.
Take a look under the strap before you start—no one wants a surprise wrestling match with their watch.
If the leather’s stiff, it might need a little wriggling or bending to get the new band on. New straps can be stubborn.
Leather needs more care than silicone or metal. Keep it dry and clean if you want it to last.
Leather bands are great for special occasions or just because you like the look. Brands offer everything from matte to shiny to wild patterns, so there’s something for everyone.
If you’re curious, this guide covers types of watch bands.
Removing the Old Band
Let’s be real—the only thing between us and a fresh new look is getting that old band off. Depending on our watch, we’ll face a quick-release pin (thank goodness) or the classic spring bar (brace yourself).
Unlocking Quick-Release Pins
Quick-release pins are perfect for those who want things easy. Most smartwatches with these have a tiny lever on the back of the band.
We just use a fingernail or small tool to slide that lever inward.
After sliding the lever, the pin should let go. Gently pull the band away from the watch.
Lay the watch face down on a soft cloth to avoid scratches. If the lever feels stuck, wiggle it gently—don’t force it.
If dirt or lint is jamming things up, a quick press with a dull pencil or fingernail usually fixes it. For a demo, check out this video on how to remove quick-release bands.
Detaching Spring Bars
Spring bars are tiny rods that fit into the watch lugs. To get them out, grab a spring bar tool or a small flat screwdriver.
Place the watch face down on something soft. Stick the tool’s forked end between the band and the lug.
Push the spring bar toward the center of the band to compress it. When the bar pops free, guide it out slowly.
Hold onto the bar—otherwise, you’ll be hunting for it under the couch.
If it’s stubborn, try wiggling the tool and keep steady pressure. Patience is key; wrestling with it just leads to lost parts.
For more tips, check out what others say about removing spring bars.
Installing the New Band
Now for the fun part—let’s put on that new replacement band. Whether you picked leather, silicone, or something flashy, how we attach it matters for comfort and security.
Attaching with Quick-Release Pins
Quick-release pins really do save us time. Slide one end of the pin into the lug, then push the lever while lining up the other end with the slot.
A little wiggle helps everything snap into place. Double-check both sides by giving them a gentle tug—no one wants a surprise flying watch.
Metal bands with quick-release sometimes need a bit more muscle, but silicone and leather usually pop on without trouble.
If you didn’t launch a pin across the room, you did it right. For extra help, here’s a video on replacing a smartwatch band.
Securing Spring Bars
Spring bars are the go-to for classic leather or metal straps. These tiny rods have spring-loaded tips that snap into place between the lugs. Start by sliding one end of the spring bar into its hole.
Grab a spring bar tool, a small flathead screwdriver, or—if desperation hits—a butter knife. Push the other tip in and nudge it toward the opposite hole. When you hear a soft click, you’re good.
It honestly feels a bit like threading a needle and takes some patience. Give both sides of the band a gentle tug to check if it’s secure. If anything moves, you’ll need to try again.
Working over a towel isn’t just smart—it keeps runaway spring bars from bouncing off into oblivion.
Adjusting Band Fit for Comfort
Getting the perfect fit isn’t just about style. A good fit keeps your smartwatch from sliding all over or cutting off your circulation.
Leather straps usually have several holes for adjustment. If not, you might need to punch a new one or hit up a repair shop. Silicone bands work like classic straps, sliding through a buckle.
Metal bands can be trickier. Sometimes you’ll need to remove links using a link removal tool, or just follow a strap replacement video. As a rule of thumb, you should fit one finger between your strap and wrist.
If the band pinches, sticks, or threatens to cut off blood flow, it’s time to loosen up. Your wrists will thank you later.
Caring for Your Smartwatch Band
A clean, well-kept smartwatch band looks better and helps avoid weird smells, stains, and even skin irritation. Let’s be real—no one wants their wrist to smell like a gym bag.
Cleaning Different Band Materials
Bands come in all sorts: silicone, metal, fabric. Each one needs a little TLC, kind of like we wish our socks would get.
For silicone and plastic bands, stick with mild soap, warm water, and a soft cloth or brush. Skip harsh chemicals and scrubbing pads. Rinse well, pat dry, and let it air out.
Metal bands can get gross if you’re not careful. Use diluted dish soap, a soft toothbrush, and a little effort. Dry them with a soft towel. For fancier bands, watch for water hiding in tiny crevices.
Fabric bands soak up every drop of sweat. Give them a mild soap soak, a gentle hand wash, and plenty of air-drying time. Please don’t microwave them—seriously, just don’t.
| Band Type | Cleaning Tools | What to Avoid |
|---|---|---|
| Silicone | Soap, water, cloth | Harsh chemicals |
| Metal | Soap, toothbrush | Soaking for too long |
| Fabric | Mild soap, water | Machine washing |
Maintaining Leather Straps
Leather straps are the divas of smartwatch bands. You have to pamper them a bit if you want them to stay flexible and stylish.
Wipe the strap with a dry microfiber cloth to get rid of dirt and oils. For a deeper clean, grab a leather cleaner and actually read the directions. Water stains are a nightmare here, so keep the strap dry.
Try to keep leather away from water, sweat, and direct sunlight. If the band gets wet, blot (don’t rub) and let it air-dry naturally.
Every few months, use a small amount of leather conditioner. This keeps the strap from cracking and helps it age well—if only we all could. Swapping bands is also a great excuse to pick up another, which is half the fun anyway.
Troubleshooting Common Problems
Changing a smartwatch band should be easy, but sometimes it turns into a mini-drama. A stubborn connector or a stuck pin can turn a quick swap into a real headache.
Band Won’t Attach Securely
We’ve all been there: you think the new band’s locked in, but one wrist shake and it’s airborne. Double-check that you’re lining up the connectors just like the manual shows—not upside down or backward. Some bands have their own quirks, so don’t force them.
Before you panic and call tech support, make sure to push the band in until you hear or feel a click. No click means it’s not secure. Sometimes dirt or gunk gets stuck in the grooves, so try cleaning with a toothpick or soft brush. If the band still won’t stay put, Samsung’s guide for proper smartwatch strap installation has some helpful visuals. If it keeps popping off, try another certified band—some knock-offs just don’t fit right.
Stuck Pins or Bars
Pins or spring bars can get stuck faster than peanut butter to the roof of your mouth. If yours won’t budge, make sure you’re using the right tool. A spring bar tool or even a tiny screwdriver usually does the trick—though let’s be honest, we’ve all tried a house key in a pinch.
Press in gently on the pin or bar. It should compress and let the band slide out. If it doesn’t, don’t force it. Bent or broken pins probably mean a trip to tech support or a new band. Dirt and dried sweat love to clog these parts, so a little rubbing alcohol and patience can help. If they’re still stuck after all that, maybe it’s time to call in a pro—hopefully someone with more patience than you had at minute fifteen.
Band Feels Uncomfortable
If your new band feels more like a wrist trap, don’t just tough it out. Check the sizing—adjustable bands should fit snugly, not tightly. Try moving it one notch looser or tighter.
Sweaty skin? Silicone bands especially can irritate if soap or lotion gets trapped underneath. Some people just can’t deal with certain materials, so fabric or leather bands might be better. Washing the band with mild soap and water can help with itchiness and weird smells. If nothing works, maybe it’s just time to shop for a new band—retail therapy counts, right? If you’re really stuck, forums like Android Central have loads of tips from folks who’ve seen it all.
Exploring Stylish Band Alternatives
Customizing your smartwatch by swapping the band can totally change its vibe. There are bold colors, classic finishes, and every material you can think of to fit your style and your day.
Mixing and Matching Replacement Bands
Honestly, who wants to wear the same band every day? Switch it up: sporty silicone for sweaty workouts, classic leather for when you need to look like you’ve got it all together.
Some bands use quick-release pins, so you can swap styles in seconds. If your smartwatch has standard lugs, you might even share bands between brands—more options and more excuses to buy another cute band.
If you can’t decide, keep a little collection on hand. Match your replacement band to your mood, outfit, or even the weather. If only changing your hairstyle was this simple.
Choosing on-Trend Materials
Nobody wants an outdated wrist. Silicone, stainless steel, and leather straps are top picks for smartwatch style. Silicone bands come in every color imaginable and clean up easily—perfect for the messy among us.
Leather straps bring a polished look, great for work or fancy events. Stainless steel and mesh bands add some bling, and who doesn’t love a little sparkle?
Natural fibers, recycled materials, and vegan leather are picking up steam for eco-minded folks. For more on changing bands and staying on trend, check out advice on replacing smartwatch bands.
When to Seek Professional Help
Sometimes DIY just isn’t enough, and that’s totally fine. If you’re lost, frustrated, or worried about breaking your expensive gadget, it’s time to call in the pros.
Contacting Tech Support
No one loves calling tech support, but sometimes you just have to. When the band won’t budge or pins disappear, those folks can save your day.
Reach out if the band refuses to come off, weird parts start falling out, or the replacement band doesn’t fit, no matter how hard you squint at it. Before you call, grab the model number, warranty info, and maybe snap a few photos in case they want proof.
Some companies even offer live chat or email—thank goodness for that. You can also try third-party help sites like JustAnswer if you want expert advice without ever leaving the couch.
Finding Authorized Service Centers
Sometimes YouTube tutorials just make everything more confusing, don’t they? When that happens, it’s honestly a good call to find an authorized service center.
These folks really know their way around our devices. They’ve got the right tools and, thankfully, won’t void the warranty just by poking around.
Most brands actually list their authorized centers right on their official websites. If you’re feeling iffy about that random local shop, it’s probably smarter to stick with the official route and dodge any smartwatch disasters.
Even Barton Watch Bands says it’s the way to go if you’re not totally sure what you’re doing. No shame in that at all.
Don’t forget to bring your proof of purchase. Toss those tiny screws in a plastic bag so you don’t lose them, and maybe bring a snack—waiting rooms can get weird in the world of tech repairs.

From a young age, I have always had a big interest in technology, and this blog is an extension of that interest. Through this blog, I hope to provide others with all of the information they need regarding tech options to consider, and things such as compatibility. Some of the different items I will be discussing include headphones, smartwatches, and how to fix common issues.
- Why is my fitness tracker not connecting to my headphones? Bluetooth Blunders and Tech Tantrums Explained - July 5, 2026
- How to Change the Band on a Fitness Tracker Without Breaking a Sweat (or the Tracker) - July 5, 2026
- How to use a smartwatch for medication reminders without letting your pills boss you around - July 4, 2026

")


")
