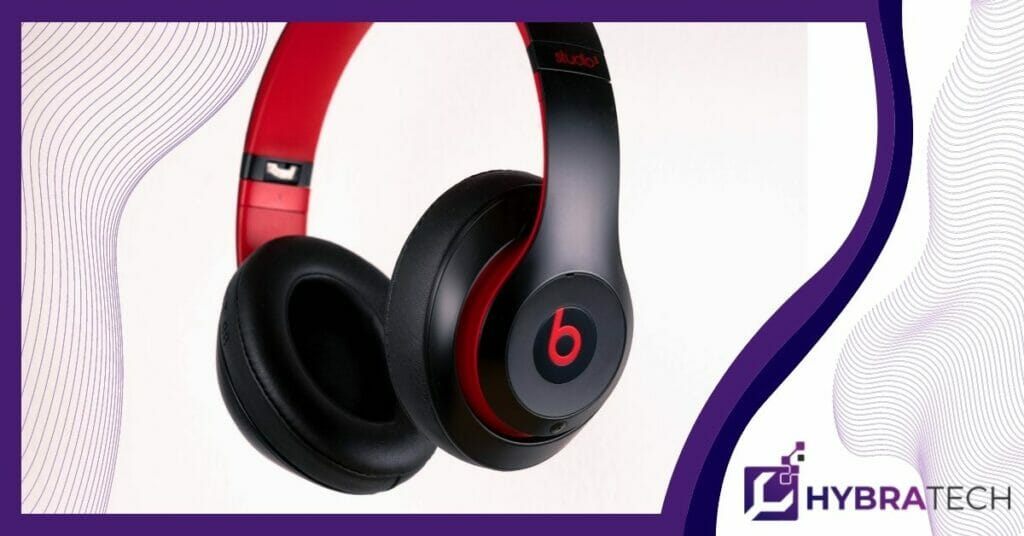
Hey, got a new pair of Beats wireless headphones? Let’s get them turned on so you can start enjoying their cool design and great sound. Keep in mind that different Beats models may vary in button placement and operation, but the overall process remains similar.

First things first, locate the power button on your Beats headphones. On most models, it can be found on the left earcup or in-ear versions, on the right side of the cable, just below the right earbud. Once you’ve found the button, press and hold it for a few seconds to turn on the headphones.
You should see an indicator light, usually white or green, which signals that your Beats are powered on and ready for use.
Key Points
- Locate the power button on your Beats headphones to turn them on.
- Pair your Beats with a device for seamless connectivity and control.
- Understand basic controls, such as volume and call management, for a smooth user experience.
Beats Wireless Headphones Overview
Congratulations on choosing Beats wireless headphones! They’re known for their excellent sound quality, making them perfect for your favorite tunes. From bass-heavy tracks to rich vocals, these headphones are equipped to deliver amazing audio.
What makes them even more special is their noise cancellation feature. You can now enjoy an immersive listening experience without any distractions from your surroundings. Thanks to the large, cushioned ear cups, your ears are comfortably covered and the headphones feel secure around your head.
With Beats wireless headphones, you get to enjoy the best of both worlds: no tangled cords and top-notch sound quality. Pairing them with your device is a breeze, allowing you to fully enjoy them almost instantly.
Before purchasing, it’s essential to know what to look for in a good pair of headphones to make sure they live up to your expectations and last for a long time. With proper care and usage, your Beats wireless headphones are built to stand the test of time.
Just like other types of headphones, Beats also offer a variety of in-ear headphones with superb sound quality and comfort. Having a couple of options allows you to pick the perfect pair for your listening preferences and comfort levels.
So, get ready to enjoy your music in style and with incredible audio fidelity. Your Beats wireless headphones have the features and performance that will make you fall in love with your music all over again!
Turning On Your Beats Headphones
In this section, we’ll explore turning on various Beats headphone models.
Beats Studio
To power on your Beats Studio, first locate the power button, usually found on the left earcup. Press and hold it for a few moments until you see the indicator light flash, signaling that your headphones are on. Make sure the battery is charged, and if needed, charge it by connecting the headphones to a power source using the appropriate cable.
Beats Solo
For Beats Solo headphones, you’ll find a power button on the right side of the headphones. Follow the same steps: press and hold the power button until the indicator light flashes, showing that your Beats Solo are on and ready to use. Remember, a charged battery is crucial for your headphones, so periodically check it and charge when needed.
Powerbeats
To turn on your Powerbeats headphones, just press and hold the power button for a few seconds. The power button is usually located on the left earbud. Like the other models, you’ll see an indicator light flash when they’re turned on. You should always keep an eye on the battery and charge it as needed to ensure a seamless listening experience.
Beats Flex
For Beats Flex headphones, the power button is on the right control module. To turn on your earphones, press and hold the button for one second. Don’t forget to charge your earphones using the included USB-C cable, providing you with up to 12 hours of playback from a full charge.
Beats Studio Buds
When it comes to Beats Studio Buds, the power button can be found on the outer side of each earbud. A single press on either side will power on your headphones. The indicator light will give you information about the battery life. Make sure to charge your Studio Buds using the appropriate charging case or cable.
So thats the quick and easy method for the latest Beats headphones so lets move on to making sure we can use these Beats headphones to the fullest extent. Lets start with pairing them to various devices!
Pairing with a Device
Pairing with iPhone
Excited to listen to your favorite music on your Beats wireless headphones? First, turn on your Beats headphones. To pair them with your iPhone, go to Settings and turn on Bluetooth. Your Beats headphones should automatically enter pairing mode when you turn them on for the first time. Choose your Beats headphones from the list of available devices and you’re all set!
Pairing with Android Device
Pairing your Beats headphones with an Android device is easy! Make sure the Bluetooth on your Android device is turned on. Just like with the iPhone, your headphones should enter pairing mode when you turn them on for the first time. If not, check the manual to activate pairing mode. Once in pairing mode, search for available devices on your Android and select your Beats headphones to connect. Now you’re ready to groove to your favorite tunes.
Pairing with iPad
Get ready to enjoy amazing sound quality on your iPad! Turn on your Beats headphones and make sure your iPad has Bluetooth enabled. With your headphones in pairing mode, your iPad should recognize the Beats headphones. Select them to connect, and you can start enjoying your favorite music or movies right away!
Pairing with iPod
To pair your Beats headphones with your iPod, first ensure your iPod has Bluetooth capabilities and that it’s turned on. Power on your Beats headphones and let them enter pairing mode. Once they’re discoverable, your iPod should show them as an available Bluetooth device. Choose the Beats headphones, and you’re good to go!
Pairing with Mac
Ready for an immersive audio experience on your Mac? Start by turning on your Beats headphones and enabling Bluetooth on your Mac. Your Beats headphones will enter pairing mode, allowing your Mac to locate them as an available device. Connect to your Beats headphones and you can start enjoying high-quality sound while you work or play!
Pairing with Windows
Connecting your Beats headphones to a Windows computer is a breeze! Just turn on your headphones, and make sure the Bluetooth feature on your computer is enabled. Once in pairing mode, navigate to your Windows settings, find Bluetooth devices, and select your Beats headphones to pair. Now you’re all set to enjoy your favorite music, games, or shows with amazing audio quality!
Controlling the Volume
Next up is controlling the volume, generally this is the easiest feature to get used to, but there are some interesting tid bits that you might need to know.
You’ll find volume buttons on your Beats wireless headphones, making it super easy to increase or decrease the sound levels. To turn up the volume, simply press the “+” volume button. Feeling like the music is too loud? No worries, just press the “-” volume button to decrease the sound. There, now you’ve got the perfect volume for your listening experience!
Sometimes, you might find that your headphones are too quiet. Don’t worry; we have a solution for that too! Be sure to check your connected device’s volume settings as well. It’s possible that your device’s volume might be turned down, which could be affecting your headphone’s volume.
Also, keep in mind that your headphones and connected device work together when controlling the volume. So, if you increase the volume on your device, it will also affect the output on your headphones.
Handling Calls, Music, and Siri
Beats wireless headphones make it super easy to manage all the aspects of your audio world. Let’s dive into how to handle calls, music, and Siri with just a few simple steps!
You’re listening to your favorite tunes when suddenly your phone rings. No worries! Just press the “b” button on your headphones once to answer the call. To end the call, press the “b” button again. Adjusting the call volume is a breeze too, simply use the volume buttons on the headphones to find the perfect level for your conversation.
Jamming out to music is what your headphones were made for, right? To play music, just hit the “b” button once. Need a break from the beats? Press the “b” button again to pause. Skimming through your playlist is no problem; double press the “b” button to skip to the next track, and triple press it to go back to the previous song.
Now, let’s talk about your personal assistant – Siri! To activate Siri, press and hold the “b” button until you hear a tone, then release and ask your question or give your command. Need to stop Siri from reading messages out loud? Just ask Siri to turn off the feature. And you can always deactivate Siri by pressing the “b” button again.
Physical Features and Functions
Your Beats wireless headphones come with some amazing features that are going to make your listening experience fantastic! Let’s take a look at what your headphones have to offer and how you can make the most of them.
First off, your Beats headphones come with a stylish case that not only protects them but also makes it easy to carry them around. The case is designed to keep your headphones safe and sound, so be sure to use it whenever you’re on-the-go!
The charging process is super simple! Your package includes a USB charging cable that you can use to charge your headphones. Locate the charging port on your headphones, connect the charging cable, and plug the other end into any USB port. Keep an eye on the battery indicator, and once it’s fully charged, you’re all set to enjoy your favorite tunes!
Now, let’s talk about turning your Beats headphones on and off. You’ll find a handy toggle switch on the headphones. To turn your headphones on, all you need to do is flip the switch and watch for the LED light to indicate that they’re powered on. When you’re done listening, just flip the switch back to turn them off. Easy, right?
Your Beats headphones also come with a charging case that adds an extra layer of protection and convenience. Whenever your headphones run low on battery, simply place them in the charging case, and they’ll charge up without any hassle. Plus, the charging case itself can be charged, so you’ll always have some extra juice for your headphones when you’re out and about.
Tips for Bluetooth Connection and Troubleshooting
Are you excited to get your Beats wireless headphones connected to your device and listen to your favorite tunes? No worries, we’ve got you covered! With these quick tips, you’ll have your headphones connected in no time.
First, make sure your headphones are charged and turned on. The LED indicator will light up when they’re powered on. Ready for some sweet sounds? Go to the Bluetooth settings on your device and look for your Beats headphones in the list of available devices. Found them? Great, now click on the name to pair and connect them.
Sometimes, your headphones might have connection issues – but don’t worry, we’re here to help you troubleshoot the problem. There are a few common issues that can occur, and most of them can be easily fixed.
If your Beats headphones keep cutting out, make sure you’re within the Bluetooth range of your device. Walls or other obstacles can block the signal, so try staying in an open space. Battery life is important too, as low battery can cause connection problems. Keep an eye on the Fuel Gauge to know when it’s time to recharge your headphones.
Didn’t fix the problem? It might be time for a reset. A factory reset can do wonders for your Bluetooth connection and get your headphones back in sync with your device. Keep in mind that this will erase any previously paired devices, so you’ll need to pair them again. Here’s how to reset your Beats headphones:
- Press and hold the power button for about 10 seconds.
- The Fuel Gauge LEDs will blink, and eventually, one LED will blink red.
- After the lights stop flashing, the reset is complete.
Remember, the key to a smooth Bluetooth connection with your Beats wireless headphones is to understand the basics of pairing, adjusting settings, and troubleshooting. These tips should help you keep the connection strong and stable.
Now onto Batteries and charging!
Battery and Charging
When it comes to using your Beats wireless headphones, it’s essential to make sure they have enough battery life for your listening needs. Luckily, charging your headphones is a breeze! All you need is a compatible power source and your designated charging cable.
To begin charging your Beats, simply plug the charging cable into a suitable power source. Keep an eye on the indicator light on your headphones, as it will give you valuable information about the charging status. When your headphones are charging, the light will typically flash, and once the battery is full, the light will remain steady.
Battery life can vary depending on your specific Beats model and usage habits. So, it’s a good idea to familiarize yourself with your headphones’ battery capacity and expected playtime on a single charge. One of our recent articles about “How Long Do AirPods Take To Charge?” offers some great insights on battery life and charging times for similar products.
Don’t forget that you should always keep your headphones at a comfortable volume. Excessive volume can not only damage your hearing, but it can also cause your Beats to consume more battery power than necessary. Strike a balance between enjoying your music and preserving battery life to get the most out of your Beats wireless headphones.
By keeping your Beats charged, monitoring the indicator light, and practicing safe listening habits, you’ll ensure that your wireless headphones are always ready for your next listening session. Happy listening!
Additional Accessories and Alternatives
Are you looking for more ways to enjoy your Beats wireless headphones? Great news! There are additional accessories and alternatives that can make your experience even more exciting. Let’s dive in and explore some of these fantastic options!
First, let’s talk about the Beats Studio Buds+. These sleek and stylish earbuds are a fantastic alternative to traditional Beats wireless headphones. They offer the same amazing sound quality and come with a compact charging case. Plus, the Studio Buds+ are designed for a comfortable and secure fit, making them perfect for long listening sessions or active lifestyles.
Another cool thing to consider is the Beats app for Android devices. The app lets you easily manage your Beats wireless headphones, customize sound settings, and even get quick tips on how to use your new earphones. It’s super helpful and makes an excellent addition to your Beats experience.
When it comes to accessories, there’s a whole world of possibilities. For example, you might want to consider getting a protective case or pouch to keep your headphones safe from scratches and damage. It’s also a good idea to invest in some spare ear tips or cushions in different sizes for the perfect fit.
If you’re a fitness enthusiast, why not look into getting a sweat-resistant armband or waistband for your device? This way, you can keep your phone or music player secure while jogging or working out, without worrying about damaging it with sweat.
And finally, don’t forget about the importance of a good cleaning kit. Regularly cleaning your headphones can help maintain their sound quality and keep them in tip-top condition. Look for a kit with gentle, non-abrasive cleaning tools like soft brushes, wipes, and disinfectant.
So there you have it! With these amazing accessories and alternatives for your Beats wireless headphones, your listening experience will be top-notch. Happy grooving, and enjoy your new gear!


